November Favorites! (Maybelline and Loreal)

Hello everyone!

Today I wanted to share 3 of my current favorite products that I have been using every single day. As of late, I’ve been pretty simplistic with my daily makeup, focusing mainly on the skin and brows, and little else. We all go through makeup moods, right?

First off, the Maybelline Brow Drama has been a game-changer. I had been using a clear brow gel for awhile, and it worked decently. However, this is tinted (comes in several shades, I have blonde), and I had never used a tinted brow gel before.

I change up my brow product fairly often, just because I like to try new things (and also because my ride or die ELF Essential Eyebrow pencil has been sold out in my color for WAY too long. It’s back, don’t worry). I’ve been using a Wet n Wild pencil in the color Taupe (it’s supposed to be eyeliner, but it’s actually a perfect color for blonde hair) to fill in my brows, and then I set them with the Brow Drama. The results are ideal, and the staying power of the gel is quite impressive. Your brows literally will not budge. This is exactly what I have been looking for in a brow gel, and luckily, it’s only about $6.

Next up is the Maybelline SuperStay Better Skin Concealer.

  I had heard positive reviews about this concealer, and so I decided to try it out when I ran out of concealer. It has a yellowish undertone, and so it is perfect for the undereye area. I apply it with my Real Techniques Beauty Blending Sponge, strictly in my undereye area. I’ve been setting it with the yellow-toned powder in the ELF contour kit, and the result is lovely. My eyes look wide awake (though they rarely are) and it does not crease. I’ve been very impressed by this, especially since it’s only about $7 🙂

Finally, I had been interested in trying out a new foundation for awhile. I’ve used the Covergirl 3 in 1 for about 2 years, and so I figured it was time to switch it up. I went with a classic, after doing research on YouTube. The Loreal True Match is absolutely wonderful!

 First of all, I love the color range. There are so many different shades, and they are even divided up into Cool, Warm, and Neutral undertones. I went with neutral, since I can never decide what I am, and the Neutral Soft Ivory N1 ended up being perfect. I also apply this with my Real Techniques sponge, and a little goes a long way for me. I would say that this is a medium coverage foundation, but can definitely be built up. The reason that I say that a little goes a long way is because it this foundation is quite thin, and when applied with a sponge, it spreads very easily and evenly on the skin. It’s very thin and light, and so it feels and looks very natural on the skin. On that note, I would also suggest applying it with a damp sponge, to get a really smooth finish. I am planning on purchasing the matching powder to go with it, next time I have the chance.

I hope you are all enjoying this beautiful holiday season, and thank you for still reading, even though I was non-existent for several months.

Looking forward to getting back into the blog-life, and reading all of your amazing posts! 🙂


Back to School Favorites from City Color and Maybelline!

First week of classes and I’m already stressed, which means getting very little sleep. That’s college for ya. For all the ladies out there who have super dark under-eye circles, trust me when I say that I feel your pain. I’ve also been getting up earlier than normal, due to having early classes this semester, and at 7:30 AM, I have a hard time putting on a full face of makeup. So, I thought I would share my 2 back-to-school favorites that I have been using on a daily basis in my very quick makeup looks, where my main goal is to look awake and fresh-faced.

The Maybelline Age-Rewind Concealer has been my absolute savior for under-eye circles.

I had heard many good things about it online,  but was always reluctant to buy it because it’s about $8 in stores (I know, that’s pretty cheap, but for a drugstore product it was a little steep in my mind). However,  now that I’ve used it daily for about a month, I can say with confidence that it was completely worth every penny. This is probably the best concealer I’ve ever used. It’s supposed to be for the under-eye area, but I’ve also been using it on some problem areas around the nose and on the chin. It’s incredibly brightening, and the sponge applicator is really nice because you don’t apply a truckload of product. The concealer has a very thin consistency, yet has the coverage of many very thick concealers. It conceals and brightens, and I think this might become a holy grail product for me. I’ve always had trouble finding concealers that don’t crease and become oily after a few hours, and I haven’t had that problem AT ALL with this. Granted, I’ve been setting it with the ELF Eye Brightening Powder, but the combo has been stellar for the under-eye area. This is a product that if I had no time to do anything else, this would be the one product that I would use. Having a bright under-eye area just looks so healthy and can lift your entire face.

The City Color Cosmetics HD Powder has been my go-to choice for an all-over dusting to set my foundation. I received it in an Ipsy bag, but you can find it online for $5.99 here: http://citycolorcosmetics.com/face/hd-powder/#.VfTBIhFViko

(I received a sample size  version of this product, which is why the packaging looks completely different on the website)

This is a loose, white powder that is translucent on the skin. I have combination skin, but in general, my skin gets very oily throughout the day. This has made my makeup last longer on my skin and has reduced shininess like no other! I have used so many powders in my makeup days, and even one that is called “oil control” doesn’t have this impact on my skin. It has a very soft texture and makes my face feel like baby skin. The downside for me is that since it is loose, the jar gets very messy and I often sneeze while putting it on. Also, it really needs to be blended in well, otherwise you’ll end up with white spots on your face. I’ve been applying it in a thin layer with the ELF Complexion Brush, and it’s been working great.

Let me know if you’ve tried out these products and what you thought!

Here’s the link for Ipsy if you’re interested! It’s $10/month for 5 higher-end products (usually sample size, but they are big enough to use for quite awhile). You also get a super cute makeup bag every month!

https://www.ipsy.com/new?refer=uqrhh

Hope you all are having a great weekend! Be sure to follow my Instagram @flannelbeauty for blog updates!

Battle of the Brows-Reviews on 3 Brow Products! (Lorac, ELF, City Color)

Happy hump day! It’s been quite awhile since my last post, simply due to moving back to school and getting in the groove of classes, etc. However, though my blog posts stopped, my obsessive makeup-shopping did not. I have been very obsessed with brows lately, probably because I got mine threaded for the first time ever (and that was the first time ever getting my brows done, EVER) and I am now hooked. Brows are ALWAYS a part of my makeup routine, and so I like to try new brow products all the time to experiment with what turns out the best.

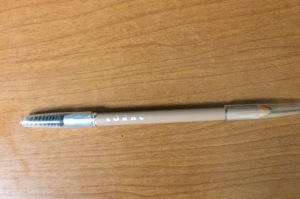
First off is the Lorac Creamy Pencil (I have the shade Blonde). I know this isn’t necessarily a budget beauty item (retails for around $20), but I found it on Hautelook for $7 (PSA: Lorac will be on Hautelook this Friday, 9/4, so GET ON THAT).

IMG_2341

(There will be a swatch of all 3 products at the end of the post)

I love how natural this makes my brows look. The color is spot on for my brows, and I have definitely had some trouble with finding an appropriate color for mine. This comes in several shades, including auburn (which I have never seen before, but probably because I generally stick with drugstore finds). It has a very creamy texture, and it’s easy to apply if you keep it sharpened. It is just a pencil with a brush on the end, and the pencil definitely needs to me maintained in order to get the maximum amount of color and precision. I also really like the brush on the end because it’s very durable, and it works great to brush out the color a bit to make sure it’s evenly applied. I honestly don’t think that it’s worth the full price, but if you can get a good deal on it like I did, I think it’s a great option. I will say that a definite con for me is the fact that it needs to be sharpened regularly, simply because I am lazy, and also because the pencil doesn’t last quite as long as I would like. I have stopped using it every day because I don’t want to have to buy a  new one just yet! All in all this is a great option for very natural but full-looking brows, but in my opinion, the full price of $20 is not worth it. Keep your eye out for it on Hautelook-there are always amazing deals!

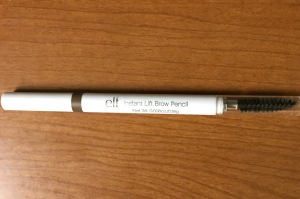
Next up is the ELF Instant Brow Lift Pencil (I have the shade Taupe).

IMG_2342

This is a very cool-toned shade that is also perfect for my brow color (online it says that Taupe is good for blonde-light brown hair, and I would have to agree). There are 3 shades of this product. This also has a very creamy texture, but it’s in the form of a twistable crayon. I prefer the crayon to a pencil because I don’t need to sharpen it, and it lasts longer. There is also a brush on the opposite end of the crayon, which again, is great to brush the color through to ensure an even distribution. This is my favorite product of the three that I am reviewing because of the crayon-form, and also because this is one of the first brow products that I’ve tried that hasn’t given my brows a faint tint of red. I don’t know why, but many products end up making my brows look also auburn, even if I only use a little bit (I had this problem with the ELF Studio Eyebrow Kit). The skinny tip is ideal for precision, especially at the end of the brows, where they are often more skinnier than the rest. This has become my new everyday staple, and it’s only $2 on http://www.eyeslipsface.com

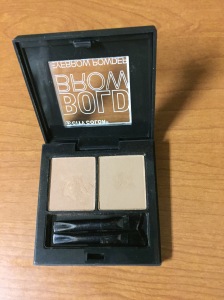
Last up is the City Color Bold Brow Eyebrow Powder (Shade: Light to Medium).

IMG_2337

I found this at 5 Below for $3, and it includes 2 powders that are only slightly different in color (although I’m glad that for a product that says “Light to Medium,” there are 2 color options). I apply this with an angled brush (the kit comes with 2 mini angled brushes). I feel sort of “meh” about this product. The color did pull a bit red on my brows, but that’s not to say that it would do that on all brow colors. I’m sure that if you had darker brows, this would be fine, but for my blonde hair, I wasn’t very impressed. You do get a lot of product for such a cheap price, so that is definitely a pro. The color just didn’t quite do it for, but in general, the texture is nice and easy to apply with the right brush. I would be interested to know if darker brows had the same issue with this product and pulling a red tint.

Also, for every one of these products, I used a clear brow gel on top to set the product, and so the staying power for all of them was roughly equivalent with the use of that gel.

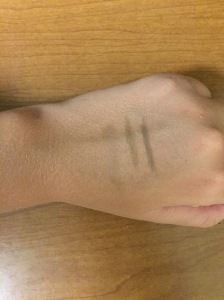
Here are the swatches of all three products:

IMG_2340

Starting on the left (it’s very very faint) is the City Color Brow Powder, and then the Lorac Creamy Brow Pencil, and the ELF pencil is on the right.

All in all, I would give the ELF product the best grade, and it just so happens to be the best price of the three 🙂

Thank you so much for reading! Comment your favorite brow product below-I’m always looking for suggestions, especially for blonde hair! 🙂

Review! City Color Contour Stick/Hightlight

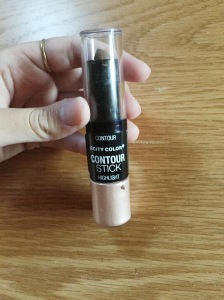
The best part about going to 5 Below is that you never quite know what you are going to find. It seems to me that there is a pretty decent turnover of products there, or at least somewhat of a variation between stores. I went to a different 5 Below than usual recently, and stumbled upon this great new find: City Color Contour Stick/Highlight.

IMG_2199

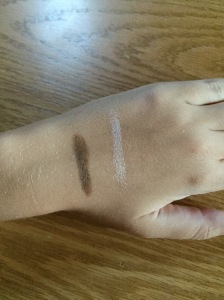
I chose the shade “Deep” even though I have  very fair skin, but the “Light” and “Medium” options did not seem like a contour at all. The “Light” was just about the color of my concealer. I definitely took a chance on this product and the color, and I had never tried a cream contour product before, either. Below are the swatches of both the contour and the highlight shades:

IMG_2200

The contour is in a twistable stick-form, and the highlight is a creamy product that you apply with a sponge tip-applicator. The highlight has a champagne-color, but blends out beautifully into your skin to provide a very subtle glow. I was pleasantly surprised with the pigmentation of both of the shades, and they are both very creamy. I applied the contour shade in my usual locations: under the cheek bones, extending upwards towards my temples, on the jaw line, and just under my lower-lip (contouring this spot can create the illusion of fuller lips). I used a damp makeup sponge to buff the color out, creating a seamless unity with the rest of my makeup. I applied the highlight shade on tops of my cheek bones, and in the cupid’s bow.

Here is the finished look:

This product provides for a fairly subtle contour and highlight, but on a day to day basis, that’s all I am really looking for. I adore this product, and best of all, it was $3.

Don’t forget to follow me on Instagram @flannelbeauty for blog updates! Thanks for reading 🙂

Quick Makeup Look-Video!

Hi everyone! Today I decided to take a stab at making a makeup video. Excuse the poor iPhone quality filming 🙂 Products will be listed below the video! Please take a quick look–it’s a super short video, and there’s a cool song in the background (need I say more?)

Covergirl 3 in 1 Foundation

Maybelline Master Conceal Camoflaging Concealer

Covergirl Clean Oil Control Pressed Powder

ELF Contour Kit

ELF Mineral Eye Primer

ELF Mad for Matte Palette

ELF Studio Endless Eyes Pro Mini Eyeshadow Palette

ELF Cream Eyeliner (Black)

Covergirl Super Sizer mascara

Maybelline Great Lash

Lorac Creamy Brow Pencil (Blonde)

City Color Be Matte Blush (Blackberry)

ELF Icicle Face Palette

Rimmel London Lasting Finish Colour Rush-  Not an Illusion

Thanks for watching!

Mini ELF Haul+ First Impressions (Mad for Matte, Contour Kit, Smudge Pot)

Hello everyone! I recently placed a small ELF order when they had a free shipping with no minimum special a few weeks ago. I’ve been so excited to get my hands on these products, so today I just wanted to share the mini haul and my first impressions of the products that I purchased.

I ordered a Smudge Pot in the color “Wine Not,” the new contour kit, and the Mad for Matte Eyeshadow Palette:

First up is the contour kit:

Simply put, this is amazing. The colors look a bit darker in pictures (especially on the website) than they really are, but the darkest shade (a cool-toned contour shade) is absolutely perfect. It creates a very natural look, and is not orange-y at all. It is also completely matte. I had heard from my favorite YouTube beauty guru, Emily Noel, that this kit was a dupe for the Smashbox contour kit, and so for $6, this cannot be beat in my opinion. The yellow/cream shade is also matte, and it is great for the under-eye area. I used it to brighten and set my under-eye concealer, and I was again, very satisfied. The white highlight shade is shimmery, but it’s not an overwhelming amount of shimmer. It looked great on the brow bone, over my blush on the cheek bones, and on the cupid’s bow. I don’t think that the warm tone would look great on me as a contour shade (it comes off a little orange) so I am still working with that shade to find a way to use it, but it is also matte.

Next up, we have the Smudge Pot in “Wine Not.”

It’s a sort of purpleish burgundy shade, and is very shimmery. The texture is almost mousse-like, and very easy to apply. I just used my finger to apply it as an all-over lid shade. I applied just a thin layer of it, since it’s a darker than the colors that I usually go for. I did you the ELF Mineral Eye Primer underneath, and after about 5 hours in the outside in the sun and heat, the color was still just as vivid, and there was no creasing whatsoever. Pictured below is my simple eye look using this product:

This was such a simply way to look like I really tried today with my makeup. One shade on the lid, a bit of bronze-colored eyeliner, and mascara. Boom.

I am more than impressed with this Smudge Pot, and I am really excited to try out more colors. Plus, they are only $3 🙂

Finally, I purchased the Mad for Matte Eyeshadow Palette, which is a relatively new product for ELF. I was extremely excited for this because I am OBSESSED with matte eye colors, and this definitely hits the spot.

I’ll just say upfront that I have only swatched these shades as of now, but a full review of this palette will be coming very soon! There are 10 shades in total, all completely matte. The texture of these is extremely buttery, and they are highly pigmented. I am especially loving the shade that is 4th from the right; I think that is going to make a fantastic crease color. This is a great collection of staple-shades that would be a great addition to your collection if you like the matte colors. Additionally, the packaging is very thin and smaller than it might look, which makes it a perfect palette to travel with (so many palettes  are too bulky to throw in a makeup bag, but this would be a perfect fit). Again, a full review of this is coming very soon, but my first impression is that I am very impressed by the texture and pigmentation of these shadows, and there is a great selection of colors. This is definitely worth the $10, so far.

Be sure to follow me on Instagram @flannelbeauty for blog updates and news! 🙂

Review! Covergirl Super Sizer Mascara

I’ve always been one to buy a mascara based on its packaging, especially if that packaging is a cute color. When this new Covergirl mascara came out, I could not resist the adorable teal and green tube, especially considering that I found a coupon for it in my local newspaper.

There are several reviews of this mascara out in the beauty community already, so let me just be another person to say that this mascara is AWESOME!

First, I apologize for my awkward looking hand in this photo.

The brush definitely took me by surprise initially; it’s just a really skinny tube-like shape, with tiny, short bristles. I am so impressed by the way that this mascara coats every single lash, including those tiny and short lashes that exist closer to your tear-duct. I tend to layer mascara on because I personally like really thick and dark lashes, but one coat of this mascara is definitely enough (though I still layer it, because eyelashes are sort of “my thing.”) The formula is fantastic; it’s not too wet, which is a crucial quality in a good mascara. Like I said before, I like to layer on the coats of mascara, even though it’s not always necessary. I’ve been combing this mascara with the ever-classic Great Lash (Maybelline), because I still think that Great Lash is amazing. The combination creates very fluffy and dark lashes, as shown below in a photo from a makeup  look in a previous post:

I cant’ get enough of this mascara. It’s a new go-to for me, and I’ve been recommending the heck out of it to family and friends because I love it so much. Plus, it’s cheap and the bottle is cute. What else could you ask for?

Review- L.A. Colors Color Balm 

Hi everyone! Today I just thought I would do a review on my most-used product of the moment: L.A. Colors Color Balm in the shade “Wham!” I found this gem at Dollar Tree, and of course I couldn’t resist. There were several color options available; I remember seeing a red, pink, and purple, in addition to the orange shade that I bought,  but I’ve seen through some online digging that there are some other color options as well. 


 The balm gives a sheer wash of color that doesn’t require a mirror for application- a quality that I love in a product for work days. You can just swipe it on and go. This color, “Wham!” is an orange-red shade, which is a color family that I’ve never stepped near before. However, since it’s a balm, this color is totally wearable for me. It is incredibly moisturizing, and it smells like vanilla. AND it’s one dollar. I give this product a huge thumbs up, and it’s now the lip product that I carry in my purse daily. 
Let me know if you’ve tried the Color Balms and what you thought! Don’t forget to follow me on Instagram @flannelbeauty for blog updates 😊