Battle of the Brows-Reviews on 3 Brow Products! (Lorac, ELF, City Color)

Happy hump day! It’s been quite awhile since my last post, simply due to moving back to school and getting in the groove of classes, etc. However, though my blog posts stopped, my obsessive makeup-shopping did not. I have been very obsessed with brows lately, probably because I got mine threaded for the first time ever (and that was the first time ever getting my brows done, EVER) and I am now hooked. Brows are ALWAYS a part of my makeup routine, and so I like to try new brow products all the time to experiment with what turns out the best.

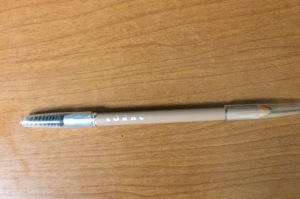
First off is the Lorac Creamy Pencil (I have the shade Blonde). I know this isn’t necessarily a budget beauty item (retails for around $20), but I found it on Hautelook for $7 (PSA: Lorac will be on Hautelook this Friday, 9/4, so GET ON THAT).

IMG_2341

(There will be a swatch of all 3 products at the end of the post)

I love how natural this makes my brows look. The color is spot on for my brows, and I have definitely had some trouble with finding an appropriate color for mine. This comes in several shades, including auburn (which I have never seen before, but probably because I generally stick with drugstore finds). It has a very creamy texture, and it’s easy to apply if you keep it sharpened. It is just a pencil with a brush on the end, and the pencil definitely needs to me maintained in order to get the maximum amount of color and precision. I also really like the brush on the end because it’s very durable, and it works great to brush out the color a bit to make sure it’s evenly applied. I honestly don’t think that it’s worth the full price, but if you can get a good deal on it like I did, I think it’s a great option. I will say that a definite con for me is the fact that it needs to be sharpened regularly, simply because I am lazy, and also because the pencil doesn’t last quite as long as I would like. I have stopped using it every day because I don’t want to have to buy a  new one just yet! All in all this is a great option for very natural but full-looking brows, but in my opinion, the full price of $20 is not worth it. Keep your eye out for it on Hautelook-there are always amazing deals!

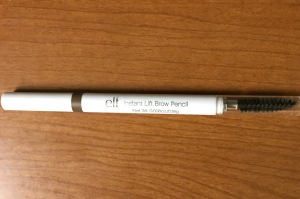
Next up is the ELF Instant Brow Lift Pencil (I have the shade Taupe).

IMG_2342

This is a very cool-toned shade that is also perfect for my brow color (online it says that Taupe is good for blonde-light brown hair, and I would have to agree). There are 3 shades of this product. This also has a very creamy texture, but it’s in the form of a twistable crayon. I prefer the crayon to a pencil because I don’t need to sharpen it, and it lasts longer. There is also a brush on the opposite end of the crayon, which again, is great to brush the color through to ensure an even distribution. This is my favorite product of the three that I am reviewing because of the crayon-form, and also because this is one of the first brow products that I’ve tried that hasn’t given my brows a faint tint of red. I don’t know why, but many products end up making my brows look also auburn, even if I only use a little bit (I had this problem with the ELF Studio Eyebrow Kit). The skinny tip is ideal for precision, especially at the end of the brows, where they are often more skinnier than the rest. This has become my new everyday staple, and it’s only $2 on http://www.eyeslipsface.com

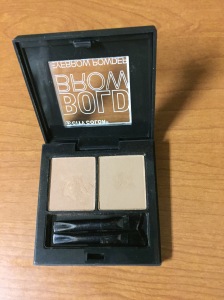
Last up is the City Color Bold Brow Eyebrow Powder (Shade: Light to Medium).

IMG_2337

I found this at 5 Below for $3, and it includes 2 powders that are only slightly different in color (although I’m glad that for a product that says “Light to Medium,” there are 2 color options). I apply this with an angled brush (the kit comes with 2 mini angled brushes). I feel sort of “meh” about this product. The color did pull a bit red on my brows, but that’s not to say that it would do that on all brow colors. I’m sure that if you had darker brows, this would be fine, but for my blonde hair, I wasn’t very impressed. You do get a lot of product for such a cheap price, so that is definitely a pro. The color just didn’t quite do it for, but in general, the texture is nice and easy to apply with the right brush. I would be interested to know if darker brows had the same issue with this product and pulling a red tint.

Also, for every one of these products, I used a clear brow gel on top to set the product, and so the staying power for all of them was roughly equivalent with the use of that gel.

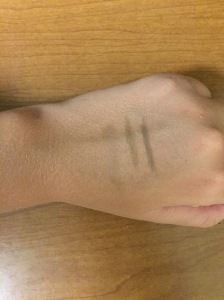
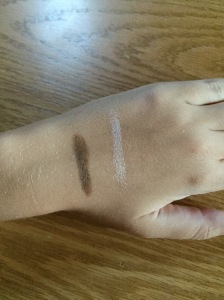
Here are the swatches of all three products:

IMG_2340

Starting on the left (it’s very very faint) is the City Color Brow Powder, and then the Lorac Creamy Brow Pencil, and the ELF pencil is on the right.

All in all, I would give the ELF product the best grade, and it just so happens to be the best price of the three 🙂

Thank you so much for reading! Comment your favorite brow product below-I’m always looking for suggestions, especially for blonde hair! 🙂

Review! City Color Contour Stick/Hightlight

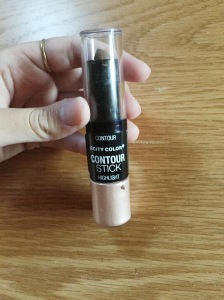
The best part about going to 5 Below is that you never quite know what you are going to find. It seems to me that there is a pretty decent turnover of products there, or at least somewhat of a variation between stores. I went to a different 5 Below than usual recently, and stumbled upon this great new find: City Color Contour Stick/Highlight.

IMG_2199

I chose the shade “Deep” even though I have  very fair skin, but the “Light” and “Medium” options did not seem like a contour at all. The “Light” was just about the color of my concealer. I definitely took a chance on this product and the color, and I had never tried a cream contour product before, either. Below are the swatches of both the contour and the highlight shades:

IMG_2200

The contour is in a twistable stick-form, and the highlight is a creamy product that you apply with a sponge tip-applicator. The highlight has a champagne-color, but blends out beautifully into your skin to provide a very subtle glow. I was pleasantly surprised with the pigmentation of both of the shades, and they are both very creamy. I applied the contour shade in my usual locations: under the cheek bones, extending upwards towards my temples, on the jaw line, and just under my lower-lip (contouring this spot can create the illusion of fuller lips). I used a damp makeup sponge to buff the color out, creating a seamless unity with the rest of my makeup. I applied the highlight shade on tops of my cheek bones, and in the cupid’s bow.

Here is the finished look:

This product provides for a fairly subtle contour and highlight, but on a day to day basis, that’s all I am really looking for. I adore this product, and best of all, it was $3.

Don’t forget to follow me on Instagram @flannelbeauty for blog updates! Thanks for reading 🙂

Quick Eye Look!

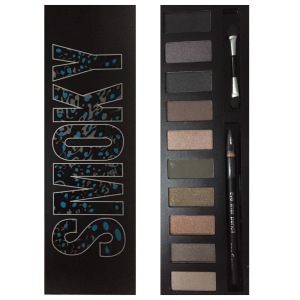
Hi everyone! I wanted to follow up on my last post, which was a review of the Profusion Smoky Palette. Here’s a little refresher if you would like, or if you’re like me and just like to gaze at pretty eyeshadow palettes 🙂

IMG_1421

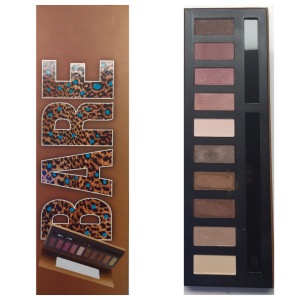
I mentioned that I was particularly fond of the color that is second from the top. It’s shimmery, and the color is unlike anything I have ever seen or used before. Its a silvery color, but there’s a pop of plum in there, and it just looks lovely.  I use it as a crease color, and I LOVE the way it looks using some shades from the Profusion Bare Palette

(check out my review of this palette here: https://flannelbeauty.wordpress.com/2015/05/31/profusion-bare-palette/)

IMG_1408

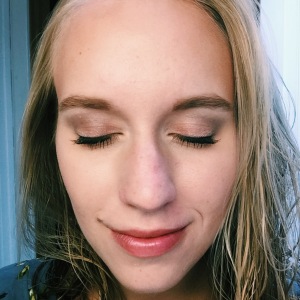
So, the color that is third from the top is probably my favorite in this palette. It’s a soft, shimmery cranberry color. Using these 2 palettes, I have created my new favorite eye look:

Processed with VSCOcam with c1 preset

To create this look, I used a few colors from each of the palettes. For the all over color, I used the shade second from the bottom from the Bare palette (just a classic shimmery champagne color), and then went ahead with that shimmery cranberry shade on just the lids. Next, I used the silvery-plum color (second from the top) from the Smoky palette on the crease, blended it all out with the first champagne color,  and then lined my eyes with the matte black (Smoky) using a super thin angled brush. You can’t tell from this picture, but I also used the angled brush to take the silvery plum color on my lower lash line, about 1/3 of the way in (I don’t tend to do anything on my lower lash line, but this ended up being a very soft line, so it worked for me). Last, I used the matte white color from the Bare palette to highlight the brow bone.

This would not be an every day look for me, but for going out or dressing up, I think it’s going to be my new go-to. I urge you all to check out these palettes, and create looks using both of them because the colors go so well together !

Be sure to follow me on Instagram from blog updates @flannelbeauty 🙂

Review-Profusion Smoky Palette

Hello everyone! As promised, I come to you today with a full review of the Profusion Smoky Palette! After great feedback from my lovely readers on the Profusion Bare Palette, I just had to share this great find with you all as well 🙂

Just like the Bare Palette, I found this gem at 5 Below for $5. I’ve said it before, and I’ll say it again: don’t be fooled by 5 Below’s “kiddy” atmosphere. Check out their makeup section for some great finds! I have found a full selection of Wet n Wild products, tons of City Color products, and some wonderful palettes from Profusion. At $5 or less, what could be better than that?

The packaging is adorable, which for me can sometimes be a selling point.

IMG_1421

The palette includes 10 different eye shadows, a black eyeliner pencil, and a standard double ended sponge applicator. The colors are all lovely, but I bought this palette mainly because it included a matte olive shadow (something that I have been hunting for lately). Only 2 of the shadows are truly matte-the olive and the black. The rest are shimmery, but it’s definitely not an overkill type of situation.

I find these colors to be highly pigmented, and with a primer underneath, last all day! The matte olive definitely lives up to my expectations-it is great as a crease shade, if you’re looking for something a little different! I used to get annoyed when palettes included black, because I just never used them. However, I love a great matte black shade now because I use it as a liner with an angled brush. Another favorite shade from this palette is the second shade from the top (the individual colors do not have names). The color is very interesting to me and unlike any color I have ever seen, and therefore hard to describe. It is definitely a silvery shade, but there’s a sort of very subtle plum color in it as well. I LOVE this as a crease color with a shimmery cranberry color (which I just so happened to get in the Bare Palette). The lighter shades make a great all-over lid color, as well as a great blending shade once you darken the crease.

These 10 colors can create countless different looks and they all blend together very nicely; this would especially be a great purchase if you are wanting to try out more smoky colors for the first time, because it gives such a great variety of colors that create the perfect smoky eye look. I love this because some of the colors are just so different than anything I have ever owned, and maybe that’s because I usually wear very natural colors, but I really feel like this palette is extremely wearable. It’s not crazy dark, but it helps you create a bit more of a dramatic look, if you so desire.

I give this palette a huge thumbs up, and I strongly recommend it to anyone seeking out a great smoky palette, or anyone who just wants to add some new colors and variety to your makeup  collection. At $5, it is a steal deal, especially since the shadows have such good quality and color variation. Let me know if you guys check this palette out, or if you have any additional questions!

Make sure to follow me on Instagram @flannelbeauty for blog updates on exclusively budget-friendly products 🙂

City Color Be Matte Blush- Blackberry

IMG_1425

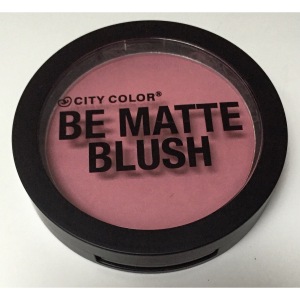
Another amazing 5 Below deal: City Color Be Matte Blush (Blackberry). This great find was only $4, so I thought I would give it a try after seeing a very positive review of it from my favorite YouTube beauty guru, Emily Noel. I have a bit of a fear of really bright blushes (I think I just need more practice with them), so I opted for this muted pink shade, Blackberry. This blush feels like velvet; it has a simply amazing texture that makes it very easy to blend out, and creates a very beautiful color on the cheeks. It is definitely matte; I had never tried a truly matte blush before, and now I am hooked. This blush is extremely pigmented-it requires a light hand with application, at least for me, because I have very light skin. Overall, I am extremely satisfied with this product, and of course, at $4, I am even happier.

There were several color options at 5 Below, and I believe there are even more available online. I was at the store Ross yesterday, a very similar concept to TJ Maxx (except even cheaper!) in the Chicago area (I’m not sure how wide of a chain it is). They had a City Color matte bronzer, in the same packaging. I would be very curious to try that out and see if it has the same silky smooth texture that these blushes have. I cannot wait to try to track down the whole line of these blushes-these have easily become a new favorite!

On another note, I am very new at blogging, and so any suggestions or feedback is greatly appreciated! I always follow back, and have enjoyed reading through some of your fabulous blogs 🙂

Be sure to follow my Instagram for updates on blog posts and beauty bargains that I find!

Instagram: flannelbeauty

Until next time!